TURN OFF ALL POWER BEFORE BEGINNING YOUR INSTALLATION
COLEMAN
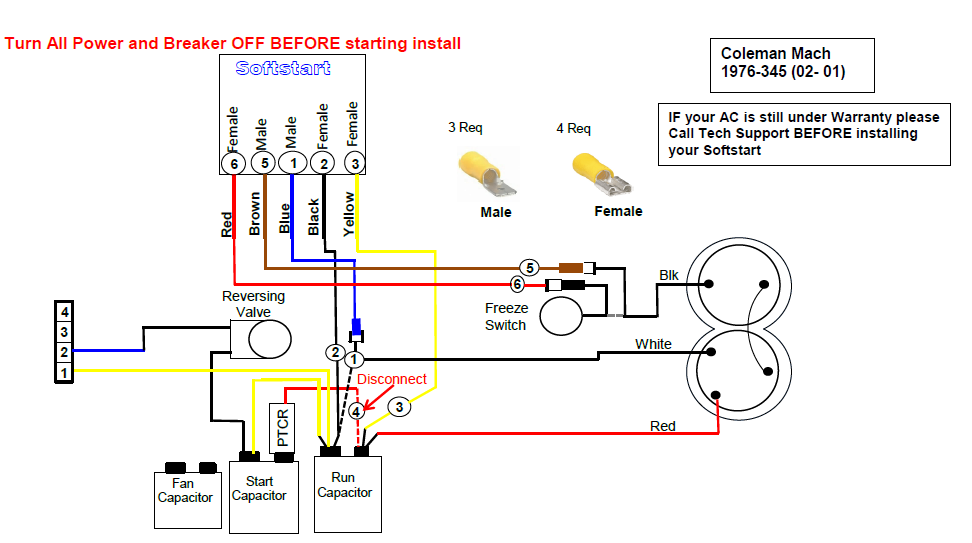
1976-345
Step 1) Follow the White Compressor wire to Run Capacitor “C” Terminal. Disconnect and connect it to the Blue SoftstartRV wire.
Step 2) Connect the Black SoftstartRV wire to the terminal the White wire was on.
Step 3) Follow the Red compressor wire from the compressor to the “HERM” terminal. DO NOT DISCONNECT RED COMPRESSOR WIRE. Connect the Yellow SoftstartRV wire on the Terminal next to the Red compressor wire if it is available (see next step).
Step 4) IF you see a 2nd Red wire next to the Red compressor wire DISCONNECT it, tape the end and drop it. Then connect the Yellow SoftStartRV wire on the Terminal where you pulled the second Red off.
Step 5) Follow the Black Compressor wire and cut it approximately 10″ from the top of the compressor (NOTE: If A/C is in warranty DO NOT CUT any wires contact tech support). After cutting the Black wire, crimp a female connector on the end that is still attached to the compressor. Now connect that Black wire to the Brown SoftStartRV wire.
Step 6) Crimp a Male Connector on the remaining loose end of the Black Compressor wire heading to the freeze switch. Then connect it to the Red SoftStartRV wire.
Now secure all the wires while you run your test to prevent the fan from pulling any wires in.
Turn the Power and A/C breaker on. Turn the fan on high until you hear it running, then turn the A/C to the Auto Cool setting and set the Thermostat to 55 degrees. Look for a Green Light on the SoftstartRV, (There may be a FULL 3 minute delay before the light turns Green).
IF after 3 min you don’t have a green light, shut the A/C OFF and contact Tech Support, www.softstartrv.com/support and fill out a ticket.
If You're Not A SoftStartRV Owner Yet, Click The Buy Now Button Below For A Special Offer